Crowns
Temporary crown guide: care, problems, and what to expect
Temporary crowns bridge the gap between prep and final. What to eat and avoid, what to do if it falls off, pain troubleshooting, care tips.
A temporary crown is a short-term cover placed on a prepared tooth during the 2 to 3 weeks between your preparation appointment and final cementation. Temporary crowns protect the prepared tooth from temperature, food, and bacteria while the dental lab fabricates your permanent crown. They are made of softer material than permanent crowns — which means they have specific care requirements. This guide covers what to eat and avoid, what to do if it falls off, pain troubleshooting, cleaning techniques, and when to call the office.

Written by Dr. Husna Khan, DDS
Serenity Dental of Bloomingdale · April 19, 2026
Temporary crown problems should be addressed promptly. Call (630) 359-0105 if your temporary falls off or is causing significant discomfort.
For the broader picture of crown procedures, see the dental crowns service page. For procedure details, see crown procedure step-by-step.
What a temporary crown is
A temporary crown is a provisional restoration placed on a prepared tooth until the permanent crown is ready. It has specific clinical functions during the 2-3 week waiting period.
In our Bloomingdale office, a loose temporary is a familiar between-visit call, and nearly all of them are quick recement visits rather than problems.
Small annoyances and true problems separate cleanly during the temporary phase once you know the sorting rule, because rough edges, dull pressure, and mild temperature awareness all fade or tolerate waiting while looseness, throbbing, and swelling each move the phone call from optional to same-day. Sort, then decide.
We see the payoff at the seat appointment, because patients who chewed on the opposite side and kept the margin clean usually have calm gum tissue.
Primary purposes
1. Protect the prepared tooth. After preparation, the tooth is a stripped-down version of itself — much of the outer enamel and some dentin has been removed. Without protection, the tooth would be extremely sensitive to temperature, air, and food contact.
2. Maintain the space. Teeth are always moving slightly. Without something filling the space where the full-size tooth used to be, adjacent teeth would drift into the opening within weeks, preventing proper fit of the permanent crown.
3. Maintain gum contour. The gum tissue around the preparation needs something to “lean against” to maintain its natural curve. Without a temporary, the gum would creep into the space.
4. Provide function. You need to eat, talk, and smile during the waiting period. The temporary provides basic function.
5. Provide appearance. For front teeth especially, a missing tooth appearance for 2-3 weeks is not acceptable. The temporary looks like a tooth.
How temporary crowns are made
Two main methods:
Chairside fabrication (most common). A plastic or bis-acryl composite material is molded into a temporary crown directly at the appointment. The dentist uses a template of the original tooth shape to form the temporary, adjusts it to fit the prepared tooth, and cements it with temporary cement. Takes 10-15 minutes total.
Preformed temporary. A commercially-made plastic or metal “shell” is selected to match the tooth size, adjusted chairside for fit, and cemented. Faster than custom fabrication but less precise.
Lab-fabricated temporary. For complex cases (multi-unit bridges, full-mouth reconstruction), lab-made temporary crowns provide better fit and durability. Costs more and requires a lab turnaround.
Temporary materials
- Bis-acryl composite (most common) — tooth-colored plastic that cures chairside
- Acrylic resin — similar but older formulation
- Preformed polycarbonate shells — for front teeth where esthetics matter
- Stainless steel temporary crowns — for back teeth in rare cases when durability is priority
Standard temporary crown care
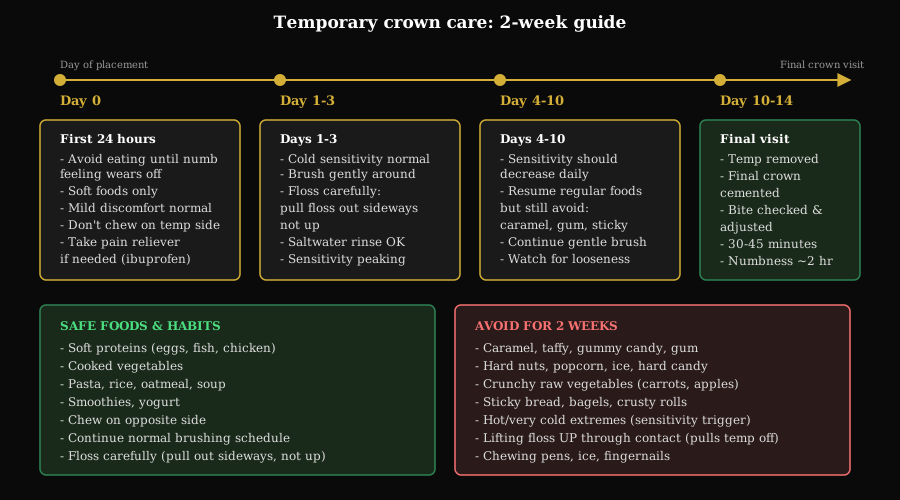
Good care of your temporary crown protects the underlying tooth and improves the likelihood that your permanent crown will fit properly.
Daily hygiene
Brushing:
- Brush twice daily with fluoride toothpaste
- Use gentle pressure around the temporary crown
- Soft-bristled toothbrush recommended
- Electric toothbrush is fine on low settings; avoid high-vibration modes directly on the temporary
Flossing (most important step):
- Floss daily, especially around the temporary
- Slide floss between the teeth to clean the contact
- Pull floss out to the side, not up — pulling up can catch the temporary and dislodge it
- If floss shreds or catches, the temporary edge may be rough; call the office
- Waxed floss is gentler than unwaxed around temporaries
Rinsing:
- Warm salt water (1/2 teaspoon salt in 8 oz water) 1-2 times daily helps reduce gum inflammation
- Avoid alcohol-based mouthwashes for the first few days (can loosen temporary cement)
- Fluoride mouth rinse at bedtime helps protect the exposed tooth structure
Dietary guidelines
Food choices directly affect temporary crown survival. Here is what to prioritize and what to avoid.
| Food category | Status | Examples |
|---|---|---|
| Soft proteins | Safe | Eggs, flaky fish, ground meats |
| Cooked vegetables | Safe | Steamed carrots, squash, zucchini |
| Soft grains | Safe | Pasta, rice, oatmeal, bread |
| Dairy | Safe | Yogurt, cheese (not sharp/crumbly) |
| Soft fruits | Safe | Bananas, applesauce, peeled apples cut small |
| Most cooked foods | Safe | Soups, stews, casseroles |
| Crunchy raw veggies | Caution | Carrots, celery (cut small, chew opposite side) |
| Chewy breads | Caution | Bagels, tough crusts (tear into small pieces) |
| Tough meats | Caution | Steak, jerky (cut small, chew opposite side) |
| Sticky candies | AVOID | Caramel, taffy, gummies, Tootsie Rolls |
| Chewing gum | AVOID | All chewing gum pulls on temporaries |
| Hard candies | AVOID | Jawbreakers, lollipops (biting), ice chips |
| Nuts | AVOID | Whole almonds, walnuts, pistachios in shell |
| Popcorn | AVOID | Kernels can fracture temporaries |
| Ice | AVOID | Chewing ice is the #1 temporary-crown-killer |
| Whitening products | AVOID | Can damage temporary material and staining |
Temperature considerations
Temporary crown materials conduct temperature more than permanent crowns:
- Very cold foods (ice cream, iced drinks) often cause sharp sensitivity through the temporary
- Very hot foods (just-boiled soup) may also cause discomfort
- Room temperature drinks are most comfortable
- Sensitivity typically resolves once the permanent crown is placed
What to do if your temporary crown falls off
Temporary crowns occasionally come loose or fall off entirely — usually from sticky foods, hard foods, or gradual cement breakdown. Here is what to do:
Step 1: Stay calm and find the temporary
Most lost temporaries can be found — check the surrounding area, any food you were eating, or even rinse your mouth and look in your hand. If you find it, rinse it gently with water and place it in a safe container (like a small zip bag).
Step 2: Assess your situation
- Pain level: Mild discomfort is normal from the exposed prepared tooth
- Time until your cementation appointment: If within 1-2 days, the temporary may not need replacement
- Tooth location: Front teeth have esthetic urgency; back teeth are primarily functional
Step 3: Call the dental office
Call Serenity Dental at (630) 359-0105. Most practices can accommodate urgent temporary crown recementations within 24 hours. Same-day appointments are often available.
Step 4: Short-term fix if you cannot be seen immediately
Over-the-counter dental cement (Dentemp, Temparin, Refilit) can temporarily re-cement the crown:
- Clean the temporary and the tooth gently
- Read the product instructions
- Apply a small amount of cement inside the temporary
- Press the temporary onto the tooth
- Bite down gently for the cement to set
- Remove any excess cement from the gumline
- Schedule a dental visit within 1-2 days regardless
Do NOT use super glue or household adhesives. These can chemically burn the tooth and gum tissue and make professional recementation or removal much harder.
Step 5: Protect the exposed tooth until your visit
If you cannot re-cement the temporary:
- Avoid chewing on that side entirely
- Avoid very hot and very cold foods
- Brush the area carefully to prevent bacteria buildup
- Over-the-counter pain relievers for discomfort (ibuprofen 400-600 mg every 6 hours)
- Sensitivity toothpaste (Sensodyne) brushed on the tooth helps with cold sensitivity
Consequences of leaving a temporary off too long
Leaving the prepared tooth exposed for days:
- Adjacent teeth shift into the space, potentially making the permanent crown no longer fit
- Opposing tooth may erupt (grow down into the space)
- Gum tissue grows into the space
- Decay can develop on the exposed tooth surface rapidly
- Pulp irritation from temperature and bacteria exposure
A delayed temporary can result in needing new impressions and a redone permanent crown — an expensive complication that prompt attention prevents.
Temporary crown pain: what is normal vs what needs attention
Some discomfort with a temporary crown is normal. Here is how to distinguish normal from problematic.
Normal temporary crown sensations
- Cold sensitivity (ice water, cold drinks) — the temporary is thinner than permanent material
- Mild pressure tenderness when first chewing — settles in a few days
- Gum tenderness near the temporary edge — settles within 2-4 days
- Slight bite awareness of the temporary feeling different — normalizes quickly
- Sensitivity when breathing in cold air through the mouth — improves over a week
These sensations are typically mild, improve over the first few days, and resolve completely with the permanent crown.
Problematic sensations requiring attention
Sharp pain on biting: The temporary is likely slightly high on the bite. A 5-minute adjustment fixes this. Call the office — do not continue chewing on the tooth.
Throbbing pain that wakes you at night: May indicate pulp involvement. The tooth nerve may have been irritated beyond the point of recovery from the preparation. A root canal may be needed before the permanent crown is placed.
Pain that does not respond to ibuprofen: Similar to above. Suggests more significant pulp inflammation. Call the office for evaluation.
Prolonged pain to heat: A particularly concerning sign — often indicates the nerve is not recovering. Root canal may be needed.
Swelling of the gum or cheek: Possible infection. Urgent dental attention needed.
Fever with tooth pain: Possible abscess. Urgent attention needed; emergency room if severe.
Temporary that feels loose but has not fallen off: Food and bacteria are accumulating between the temporary and tooth. Call the office within 1-2 days.
Pain timing patterns
| When pain occurs | Likely cause |
|---|---|
| Only when biting down | Bite adjustment needed |
| Only with cold | Normal temporary sensitivity |
| Only with heat | Possible pulp concern |
| Only when drinking sweet things | Possible leakage at temporary margin |
| Constant, throbbing | Pulp inflammation — evaluation needed |
| Spontaneous at night | Pulp inflammation — evaluation needed |
Cleaning techniques for temporary crowns
Good cleaning during the temporary phase prevents:
- Decay on the exposed tooth surface
- Gum inflammation
- Bad breath from trapped food
- Staining of the temporary
- Plaque accumulation that could affect permanent crown fit
Technique walkthrough
Step 1: Brush technique
- Soft toothbrush at 45-degree angle to the gumline
- Gentle circular motions around the temporary
- Avoid aggressive scrubbing (can dislodge temporary)
- Focus on removing plaque at the gum-tooth junction
- 2 minutes twice daily, with emphasis on the temporary area
Step 2: Flossing technique for temporaries
The key technique for flossing around a temporary crown:
- Take 18 inches of waxed floss
- Wrap ends around middle fingers
- Slide floss BETWEEN the teeth (not UP through the contact)
- Once below the contact, clean the sides of both adjacent teeth
- To exit: pull the floss OUT THE SIDE — do NOT pull up through the contact
Pulling floss up through the contact can grab under the temporary crown edge and pop it off. Pulling to the side releases the floss without pulling on the temporary.
Step 3: Optional adjuncts
- Interdental brushes for wider spaces (gentle insertion)
- Water flosser on low setting can help rinse the area without mechanical force
- Fluoride mouth rinse at bedtime protects the exposed tooth structure
Temporary crown appearance
For front teeth especially, temporary crown appearance matters for the 2-3 week waiting period.
What temporary crowns typically look like
- Color: Usually a reasonable shade match to natural teeth but may be slightly different
- Texture: Smooth but less polished than permanent crowns
- Anatomy: Basic tooth shape; less detailed than permanent crowns
- Edges: Visible line where temporary meets tooth (normal)
Most patients find temporary crown appearance acceptable for the waiting period. If appearance is a concern (bride 2 weeks before wedding, job interview the next day), lab-fabricated temporaries can be made that more closely resemble permanent crowns — these cost more but offer better esthetics.
Temporary crown staining
Temporary crown materials can pick up staining from:
- Coffee, tea, red wine
- Tobacco products
- Curry and other pigmented foods
- Some mouth rinses
If the temporary stains noticeably during the 2-3 week period, it can be polished at the final visit but is usually just replaced with the permanent crown. The permanent crown material (especially zirconia) is much more stain-resistant.
Special situations
Multiple temporary crowns
If multiple teeth are being prepared for crowns at the same visit, the temporaries may be:
- Individual temporaries (one per tooth) — easier to adjust, flossable between
- Splinted temporaries (joined together) — more stable for complex cases but cannot be flossed between
Splinted temporaries require water flossing or threader floss to clean between.
Temporary bridges
When crowns are being placed on multiple adjacent teeth with a replacement tooth between (bridge), the temporary is a multi-unit provisional. These are more complex to make and care for:
- Extra caution with sticky foods
- Threader floss required to clean beneath the pontic (replacement tooth)
- Professional cleaning may be needed before final cementation
Temporary crowns that last months (not weeks)
Occasionally, clinical situations require a temporary to remain in place longer than 2-3 weeks:
- Waiting for gum healing after crown lengthening surgery (4-8 weeks)
- Waiting for tooth symptoms to resolve before committing to permanent (4-12 weeks)
- Orthodontic adjustments before final crown placement (variable)
- Patient scheduling conflicts delaying the final visit
Long-term temporaries require:
- More durable temporary materials (sometimes lab-fabricated)
- Careful monitoring every 2-4 weeks
- Possible relining or replacement if wear develops
- Discussion of any signs of failure
Temporary crown and root canal access
If the underlying tooth needs a root canal before the permanent crown is placed, the root canal access is typically made through the temporary crown (or the temporary is removed, tooth treated, and a new temporary placed). The sequence is:
- Identify need for root canal based on symptoms
- Access through temporary or remove temporary
- Complete root canal treatment
- Place new temporary (or re-cement original)
- Wait for symptoms to fully resolve (often 2-4 weeks)
- Proceed with permanent crown when tooth is stable
When the permanent crown is placed
At the final visit, the temporary is removed and the permanent crown is cemented:
- Temporary removal: 2-3 minutes, usually no anesthesia needed
- Tooth cleaning: Removes any residual temporary cement
- Try-in: Permanent crown fitted and checked
- Cementation: Permanent cement or bonding agent used
- Bite adjustment: Final adjustment with articulating paper
- Polish: Smoothing of any adjusted surfaces
The permanent crown feels significantly different from the temporary — more stable, less sensitive, better fitting. Most patients describe the transition as “my tooth finally feels right again.”
Long-term care after the permanent crown
Once the permanent crown is in place, dietary restrictions and special care requirements end:
- Normal eating (though avoid biting into ice or hard candy)
- Normal brushing and flossing (pull-to-the-side still recommended for long-term crown protection)
- Regular dental cleanings every 6 months
- Nightguard if you grind teeth
For long-term crown care, see how long do crowns last.
Serenity Dental’s temporary crown approach
Dr. Husna Khan’s standard temporary crown protocol:
- Chairside fabrication for most single-tooth cases
- Careful shade matching to surrounding teeth (especially front teeth)
- Smooth margins to prevent gum irritation
- Bite verification before you leave
- Written post-op instructions with specific care guidance
- 24-hour contact availability for temporary problems
- Prompt scheduling of urgent issues (usually same-day)
Schedule a crown evaluation or appointment at Serenity Dental by calling (630) 359-0105. If you have concerns about an existing temporary crown, call as soon as possible — most temporary issues are quickly and easily fixed. Related: dental crowns service page.
A note on this article
This guide is general information about living with a temporary crown. It does not replace an in-person exam. If your temporary feels wrong in any way you cannot explain, an adjustment visit is quick and usually free within the follow-up window.
Living with a temporary is mostly a two-week exercise in respecting weak cement, because the shell itself rarely fails but the bond holding it is designed to release on demand at the seat appointment, which is exactly why sticky candy and forceful flossing can release it early. Weak cement is intentional. Guarding the prepared tooth underneath is the entire assignment, since that tooth has been shaped, has lost its enamel shell, and will hold the final crown only if it keeps its position and stays uninfected through the days the laboratory needs to finish its work. Protect the foundation. Eating strategy during the temporary weeks is less about a banned list and more about physics, since anything sticky can grip the shell and lift it while anything hard can crack it, which leaves the enormous middle category of normal food completely available. Physics, not lists. Travel plans deserve a mention at the prep appointment as well, because a patient leaving town for two weeks can ask for a stronger interim cement or an earlier seat date, and either adjustment costs far less trouble than hunting for an unfamiliar dentist in another city. Say so early.
Any cost figures shown on this page are Chicago-area reference ranges compiled from regional fee data, not quotes from Serenity Dental of Bloomingdale. Every dental insurance carrier negotiates its own fee schedule, and Medicaid and Medicare Advantage plans set separate schedules of their own, so the amount a plan allows can sit above or below these ranges. Your actual fee depends on exam findings, materials, and benefits, and we provide a written, itemized estimate before any treatment begins.
When to call rather than wait
Temporaries generate a lot of small questions that can wait for the seat appointment. Three situations cannot.
Call the same day if the temporary comes off completely. The prepared tooth underneath is soft-shelled by comparison: sensitive, quick to shift position, and vulnerable to fracture. Recementing takes ten minutes.
Call promptly if the temporary cracks but stays on, or if the gum around it swells. A cracked shell leaks, and swollen tissue at the margin makes seating the final crown harder.
Call right away at (630) 359-0105 for throbbing pain under a temporary, especially pain that wakes you. That is pulp inflammation talking, and knowing when to call can be the difference between a simple seat visit and a root canal first.
FAQs
What does a temporary crown do?
How long will my temporary crown last?
What do I do if my temporary crown falls off?
Why does my temporary crown hurt?
Can I eat with a temporary crown?
How do I clean around a temporary crown?
Can a temporary crown affect my bite?
Why does my tooth feel worse after the temporary crown?
Educational content only. Recommendations are personalized after an exam and any needed imaging.
About this article
Reviewed by Dr. Husna Khan, DDS, of Serenity Dental of Bloomingdale. Dr. Husna Khan provides written temporary crown care instructions at every preparation appointment and maintains same-day availability for temporary crown emergencies.
Educational content. Individual temporary crown care may vary based on the specific clinical situation. Cited sources: American Dental Association evidence-based clinical recommendations for provisional restorations, American Association of Endodontists (AAE) guidelines on interim restorations during endodontic treatment, FDA guidance on over-the-counter dental cement products.
Related: dental crowns service page.
Need help with this in real life?
Reading helps. Talking to someone who can look at your actual teeth and symptoms helps more. If you want a clear next step, we’re here.
Related articles
Dental crown cost in 2026: real pricing by material type
Zirconia crowns cost $1,000-$2,500; PFM $900-$2,000; gold $1,200-$3,000. Insurance typically covers 50%. What drives cost and how to budget.
Read article →What is a dental crown? Complete guide for patients
A dental crown is a tooth-shaped cap that covers a damaged tooth. What crowns do, when they are needed, materials, procedure, and cost.
Read article →