
Fillings
Dental Filling Procedure Step by Step: What to Expect
Exactly what happens during a filling, from numbing to bite check. Timing, tools, sensations, and what to expect at each of the 7 stages.
A complete dental filling takes 30 to 60 minutes from start to finish and follows seven predictable stages: health review, topical numbing gel, local anesthesia, rubber dam isolation, decay removal, composite placement, and bite adjustment. Knowing what happens at each stage reduces anxiety and helps you recognize what is normal vs what needs to be flagged. This guide walks through the entire process with specific tools, timing, and sensations at each step.

Written by Dr. Husna Khan, DDS
Serenity Dental of Bloomingdale · April 19, 2026
Educational content. Individual filling procedures vary based on cavity complexity — call (630) 359-0105 to schedule or ask questions.
For the broader picture of filling options, see the dental fillings service page. For what you feel during treatment, see do dental fillings hurt.
The 7 stages at a glance
Here is the full sequence with typical timing.
In our Bloomingdale office, patients regularly tell us after a first filling that the anticipation was worse than the appointment. We see numbing take longest on lower molars, so extra onset time is planned into those visits rather than rushed.
After-visit soreness follows a predictable arc worth knowing in advance, because mild cold sensitivity that fades over one to two weeks is the tooth recalibrating while sensitivity that intensifies or a bite that feels tall are both quick-fix problems that deserve a call rather than patience. Track the direction.
| Stage | What happens | Duration |
|---|---|---|
| 1. Review and prep | Health history, tooth confirmation, questions | 3-5 min |
| 2. Topical gel | Numbing gel applied to the gum | 1-2 min |
| 3. Local anesthesia | Injection to numb the tooth | 30 sec (+3-7 min wait) |
| 4. Rubber dam isolation | Dental dam placed for dry working field | 2-4 min |
| 5. Decay removal | Handpiece removes cavity with water spray | 5-15 min |
| 6. Bonding and filling | Etching, bonding, composite placement in layers | 10-20 min |
| 7. Bite check and polish | Articulating paper, adjustments, final polish | 3-5 min |
| Total | 30-60 min |
The seven stages apply to composite (tooth-colored) fillings, which represent approximately 90 percent of modern fillings. Amalgam fillings follow similar stages but skip the etching/bonding steps and require no curing light, making the procedure slightly faster.
Stage 1: Health review and tooth confirmation (3-5 minutes)
When you arrive for the filling, the dental assistant or Dr. Husna Khan confirms which tooth is being treated and reviews any health updates since your last visit.
Procedure details:
- Insurance verification confirmation
- Review of medical history and medications
- Confirmation of the specific tooth being treated
- Identification of the tooth on X-rays shown to you
- Questions about anxiety, previous dental experiences, allergies
- Updated consent and review of the planned procedure
Why this matters: The American Dental Association’s patient safety guidelines emphasize verifying the correct tooth before any irreversible procedure. This prevents “wrong tooth” errors, which are rare but historically have occurred in dentistry. Pointing to the tooth on the X-ray and having the patient confirm is a standard safety check.
Patient sensation: Nothing physical. This is a conversation and review, not a procedure.
Stage 2: Topical anesthetic gel (1-2 minutes)
Before any injection, topical anesthetic gel numbs the surface of the gum where the needle will enter.
Procedure details:
- A cotton swab or gauze is used to apply flavored anesthetic gel (typically benzocaine 20 percent or lidocaine 5 percent) to the injection site
- The gel sits on the tissue for 1 to 2 minutes
- Area becomes surface-numb before the injection
Why this matters: Topical gel reduces the sting of needle insertion by 40 to 70 percent depending on the study. The gel does not eliminate all sensation — it numbs only the surface 1 to 2 millimeters of tissue. But it makes the injection itself noticeably more comfortable.
Patient sensation: Slight taste of the gel (often flavored: mint, bubblegum, cherry). Mild tingling as the surface numbness sets in. Otherwise nothing.
Stage 3: Local anesthesia injection (30 seconds + 3-7 minute wait)
The injection delivers anesthetic near the tooth’s nerve supply to numb the entire tooth and surrounding area for the procedure.
Procedure details:
- Your dentist slowly injects local anesthetic (usually lidocaine 2 percent with epinephrine, or articaine 4 percent for lower jaw)
- The injection is delivered over 30 to 45 seconds for maximum comfort
- For upper teeth: a small amount injected near the tooth root
- For lower molars: a larger volume injected near the mandibular nerve, which numbs the entire lower quadrant
- You wait 3 to 7 minutes for full numbness to develop
- Before drilling, the tooth is tested with a cold stimulus or gentle tap to confirm it is numb before starting
Why this matters: Complete anesthesia is mandatory for comfortable treatment. A partially numb tooth causes sharp pain during drilling, which can create lasting dental phobia. Serenity Dental’s standard is to confirm numbness via objective testing before any drilling starts — not just asking if you feel numb.
Patient sensation:
- Brief sting or pinch as the needle enters (5 to 10 seconds)
- Pressure as anesthetic is deposited
- Warm, tingly sensation spreading from the injection site
- Progressive numbness in lip, cheek, or tongue over 3 to 7 minutes
- Sometimes a brief metallic taste from small amount of solution reaching the tongue
Types of injections:
| Injection type | Used for | Numbs |
|---|---|---|
| Supraperiosteal infiltration | Upper teeth | Single tooth or small area |
| Inferior alveolar nerve block | Lower molars/premolars | Entire lower quadrant including tongue |
| Long buccal block | Lower molars | Cheek tissue adjacent |
| Mental block | Lower front teeth | Lower lip and gum |
| Intraligamentary (PDL) | Supplemental for stubborn teeth | Single tooth only |
Stage 4: Rubber dam isolation (2-4 minutes)
A rubber dam (or dental dam) is a thin latex or nitrile sheet stretched over a frame that isolates the tooth being treated from the rest of the mouth.
Steps involved:
- A small hole is punched in the dam corresponding to the tooth being treated
- The dam is stretched over the tooth and secured with a clamp on an adjacent tooth
- Alternative approach: “split dam” technique for some situations uses dental dam without a clamp
- The dam keeps the tooth dry, keeps saliva off the bonding surface, and protects you from dropped instruments or debris
Why this matters: Moisture contamination is the #1 cause of composite filling failure. Even tiny amounts of saliva on the prepared tooth surface can compromise the bond between composite and tooth. Rubber dam isolation eliminates this variable. Studies show composite fillings placed with rubber dam last 20 to 30 percent longer than fillings placed with cotton roll isolation alone.
At Serenity Dental, rubber dam is used for virtually all composite fillings when anatomy permits. In rare cases where the tooth position or gum tissue makes dam placement impossible, cotton roll isolation with strong suction is used.
Typical sensations:
- Slight pressure from the clamp on the adjacent tooth (not painful)
- Sensation of having something covering part of your mouth
- Easier breathing through the nose (mouth is still open)
- Not able to swallow during treatment — you will be asked to swallow before the dam goes on
Stage 5: Decay removal (5-15 minutes)
Decayed tooth structure is removed using a high-speed handpiece and specialized burs, then finishes with slower tools.
Steps involved:
- High-speed handpiece (the “drill”) with a diamond or tungsten carbide bur spins at 200,000-400,000 RPM while water spray cools the tooth
- All visible decay is removed, along with a small amount of adjacent tooth structure to ensure clean margins
- A caries-detecting dye may be used — it stains any remaining soft decay blue or red, allowing complete removal
- Slow-speed handpiece (10,000-40,000 RPM) with round burs cleans out the cavity edges and any remaining soft dentin
- Complete decay removal is verified visually using magnification loupes
- The cavity is rinsed with water and gently air-dried (but not over-dried, which can cause post-op sensitivity)
Why this matters: Leaving even small amounts of decay under a filling leads to recurrent decay and filling failure. Thorough removal is essential, but over-preparation removes healthy tooth structure unnecessarily. The skilled dentist removes exactly what needs to be removed — no more, no less.
Typical sensations:
- Pressure and vibration from the high-speed handpiece
- Sound of the drill (which some patients find more stressful than the sensation)
- Cool water spray in the mouth
- Suction near the working area (the assistant’s role)
- Absolutely NO pain if anesthesia is working correctly
If you feel sharp pain, raise your hand. Your dentist will stop immediately, administer additional anesthetic, wait for full numbness, and continue only when you are pain-free.
Stage 6: Bonding and composite placement (10-20 minutes)
Once decay is removed, the tooth is prepared for bonding and composite is placed in layers.
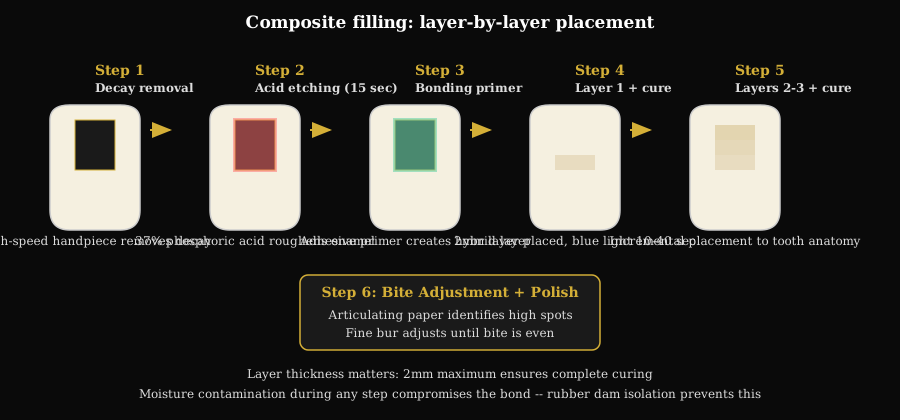
During this stage:
Etching (10-15 seconds):
- Phosphoric acid gel (37 percent) is applied to the tooth surface
- The acid creates microscopic roughness on enamel for mechanical bond
- Acid is rinsed off thoroughly
Bonding (10-20 seconds):
- Adhesive primer is painted onto the tooth
- Air-thinned and light-cured briefly
- Creates a bonded layer between tooth and composite
Composite placement (5-15 minutes):
- Composite paste is placed in the cavity in 2-millimeter layers
- Each layer is packed with instruments to eliminate voids
- Each layer is cured with the blue LED light for 10-40 seconds
- Final layer is shaped to restore normal tooth anatomy (chewing cusps, grooves)
Final cure:
- Full final cure of 20-40 seconds after all layers are placed and shaped
Why this matters: Incremental placement (layers) is superior to bulk placement for several reasons:
- Composite shrinks slightly during curing; smaller layers have less shrinkage stress
- Light cannot penetrate deeper than 2-3 millimeters; bulk placement leaves uncured deeper composite
- Layering allows the dentist to build anatomic tooth shape accurately
- Each layer bonds to the previous one
The total light exposure from all the curing cycles is harmless to eyes and tissues. Protective orange-tinted glasses are provided so you are not distracted by the blue light.
Sensations to expect:
- Pressure from the dentist’s instruments packing the composite
- Bright blue light (with protective glasses you see an orange glow)
- No pain
- Occasional sensation of the composite being shaped
Stage 7: Bite adjustment and polishing (3-5 minutes)
The rubber dam comes off, and the filling is adjusted and polished to its final shape.
During this stage:
- Rubber dam is removed
- Articulating paper (thin blue or red marking paper) is placed between the teeth
- You bite down and grind gently side to side
- Colored marks appear on the filling where it contacts the opposing tooth
- High spots are identified and reduced with a fine bur
- Bite is rechecked repeatedly until marks are even
- Polishing is done with progressively finer polishing disks and burs
- Final surface is smooth to the tongue and glossy visually
Why this matters: A filling that is even 0.1 millimeter too high bears excessive bite force, causing:
- Tooth pain on biting (most common post-op complaint)
- Reversible pulpitis if not corrected (nerve inflammation)
- Possible progression to needing a root canal
- Damage to the opposing tooth
Thorough bite adjustment at placement prevents most post-operative pain issues. Enough time is allocated for this step rather than rushing. If you later feel the filling is high once the numbness wears off, a 5-minute follow-up visit is included within 30 days.
Sensations to expect:
- Biting pressure during the articulating paper check
- Slight grinding sensation as adjustments are made
- Dentist polishing the tooth
- Ability to feel the new filling edge with your tongue (normalizes within days)
Does getting a filling hurt?
The honest answer is that the injection is the only part most people feel, and topical gel makes that a brief pinch rather than a sharp sting. Once the tooth is numb, decay removal registers as vibration and pressure, not pain. If anything sharp comes through during the procedure, say so; a second small dose of anesthetic takes effect in about two minutes and the work continues.
Afterward, the tooth can feel tender to biting for a day or two and sensitive to cold for one to three weeks while the pulp settles down. Deep cavities close to the nerve carry a longer settling period, which is why those are flagged before the procedure begins. Pain that gets worse after day three, or a bite that feels high, is the signal to call rather than wait; a 60-second bite adjustment usually resolves it.
When can I eat after a filling?
Composite (tooth-colored) fillings are fully hardened by the curing light before you leave, so the only reason to wait is the numbness itself. Wait until feeling returns, usually two to four hours, so you do not bite your cheek or tongue, then eat normally. For the first meal, chew on the other side and skip very hot drinks. Silver amalgam fillings, which we rarely place, need 24 hours before hard or sticky foods because they keep hardening after placement.
After the procedure: post-op instructions
Before you leave, Before you leave, clear post-op instructions are provided.
Immediately after:
- Wait for numbness to wear off (2-4 hours) before eating
- Drink water or clear drinks during numbness
- Avoid chewing on the filled side if possible for the first meal
First 24 hours:
- Soft foods: yogurt, soup, pasta, eggs
- Avoid very hot, very cold, sticky, or hard foods
- Normal brushing and flossing; be gentle around the new filling
- Over-the-counter ibuprofen 400-600 mg for any discomfort
First 1-2 weeks:
- Cold sensitivity is normal; use sensitivity toothpaste if bothersome
- Return to normal diet as comfortable
- Call if pain worsens, persists, or the filling feels high on the bite
Long-term:
- Brush twice daily, floss daily
- Regular cleanings and exams (3-12 month intervals based on individual risk)
- Mention any sensitivity or issues at recall visits
For complete post-filling guidance, see can I eat after a filling.
Variations from the standard procedure
Some situations change the procedure slightly:
Deep cavity near the nerve:
- A medicated liner (calcium hydroxide or glass ionomer) is placed over the deepest area to protect the nerve
- Otherwise same procedure
- Increased chance of post-op sensitivity for 2-6 weeks
Very large cavity:
- May require a buildup with core material before the final restoration
- Sometimes Sometimes an inlay/onlay or crown option will be discussed during the procedure if the cavity is larger than expected
Multiple fillings at one visit:
- Same procedure for each tooth, but scheduled together
- Single anesthesia appointment
- Typically quadrant-based (all fillings in one area of the mouth)
Pediatric fillings:
- Shorter procedure, often 20-30 minutes
- Glass ionomer or composite material
- Usually includes behavior management techniques appropriate for the child’s age
Amalgam fillings:
- No etching or bonding steps
- No curing light required
- Same overall duration, different tools and materials
What NOT to do at home
Patients sometimes ask about home cavity repair kits or DIY approaches. These are not safe and do not work.
Do not use:
- Dentemp, Temparin, or other drugstore temporary filling materials for anything other than emergency cover until you can see a dentist (they are not long-term repairs)
- Homemade “natural” pastes (clove oil, honey, coconut oil) as substitutes for filling materials
- Superglue (can cause chemical burns and never bonds properly)
- Wax or gum to “fill” a cavity
Decay continues underneath any home repair. What starts as a small cavity fillable with a $150 to $450 composite becomes a root canal ($650 to $1,500) plus crown ($1,000 to $3,500) within 6-12 months if not properly treated. The American Dental Association explicitly warns against DIY dental repair.
If a filling falls out and you cannot see a dentist for a few days, temporary drugstore materials like Dentemp can cover the cavity to prevent food from getting stuck and reduce sensitivity — but schedule a dental appointment within 1-2 weeks.
How long does a filling take?
A single filling takes 30 to 45 minutes of chair time, including numbing; a small pit-and-fissure filling can be done in 20 minutes, and two or three fillings on the same side are usually finished in one 60 to 90 minute visit. In our Bloomingdale office the numbing wait, not the drilling, is the part patients most often underestimate. Here are realistic timing expectations:
| Filling complexity | Typical chair time | What makes it longer |
|---|---|---|
| Small pit/fissure cavity, 1 surface | 20-30 min | Little variance |
| Standard 1-surface composite | 30-40 min | Deep decay near nerve |
| 2-surface composite | 40-55 min | Interproximal isolation challenges |
| 3-surface composite | 45-60 min | Reconstruction of tooth anatomy |
| Very deep cavity with pulp capping | 60-75 min | Pulp cap placement, longer monitoring |
| 2 fillings same side, same quadrant | 60-90 min | Incremental work on each tooth |
| 4 fillings all quadrants, single visit | 90-120 min | Multiple anesthesia sites, positioning |
Longer appointments allow for careful, unhurried technique. Serenity Dental does not schedule 15-minute filling slots — quality bonding and proper bite adjustment cannot be rushed.
Serenity Dental’s filling procedure standards
Dr. Husna Khan’s approach to every filling:
- 45-60 minutes scheduled for a single posterior composite
- Topical anesthetic gel applied before every injection
- Slow, buffered anesthesia delivery to minimize sting
- Numbness confirmation before drilling starts
- Rubber dam isolation when anatomy permits
- Magnification loupes for precise decay identification
- Incremental composite placement with proper curing time per layer
- Thorough bite adjustment before dismissal
- Written post-op instructions provided
- Follow-up adjustments within 30 days at no charge
Schedule a filling evaluation at Serenity Dental by calling (630) 359-0105. If you have anxiety about the procedure or have had unpleasant dental experiences, mention it when booking — we plan extra time and comfort measures. Related: what is a dental filling · dental fillings service page · filling costs.

A note on this article
This walkthrough is general information about a typical filling appointment. It does not replace an in-person exam. Your visit may differ based on cavity depth, tooth location, and the material Dr. Husna Khan recommends after looking at the tooth.
Most of the appointment’s length has nothing to do with drilling, because profound numbing takes several minutes to establish, isolation and etching are deliberately unhurried chemistry steps, and layered curing happens in small increments precisely so the finished filling shrinks less and seals better. Slow steps, tight seal. Knowing the sequence ahead of time changes how the appointment feels from the chair, since every sensation has a named step attached to it and the whir, the spray, the blue light, and the bite paper all become checkpoints on a list instead of surprises. Knowledge shrinks anxiety. Numbing wears off on its own timetable of two to four hours after the visit, and the practical consequences are worth planning around, because chewing on a numb lip causes the only common injury of filling day and hot coffee cannot be trusted while temperature sensation is offline. Respect the numbness. Requests that make appointments easier are all fair game before the drill starts, since a raised hand signal, a little extra anesthetic, a bite block for a tired jaw, and scheduled breaks cost nothing and change the experience more than any material choice does. Cold drinks wait too.
When to call rather than wait
Most post-filling questions can wait for your next checkup. Three cannot.
Call the same day if biting pressure on the new filling produces a sharp jolt. A high spot takes minutes to adjust, and chewing on it for weeks can bruise the ligament or crack the filling.
Call promptly if cold sensitivity gets worse after two weeks instead of better. Improving sensitivity is normal healing; worsening sensitivity means the pulp is irritated and knowing when to call protects the tooth.
Call right away at (630) 359-0105 for spontaneous throbbing that starts days after the appointment, especially at night. That pattern points to pulp inflammation that needs an exam, not more time.
Cost figures in this article are Chicago-area reference ranges compiled from regional fee data, not quotes from Serenity Dental of Bloomingdale. Every dental insurance carrier negotiates its own fee schedule, and Medicaid and Medicare Advantage plans set separate schedules of their own, so the amount a plan allows can sit above or below these ranges. Your actual fee depends on exam findings, materials, and benefits, and we provide a written, itemized estimate before any treatment begins.
FAQs
How long does a dental filling procedure take?
What are the steps in a filling procedure?
What tools are used during a filling?
Can I fill my own cavity at home?
Is decay removal painful?
Why does the dentist use a rubber dam during a filling?
What does the blue light do during a filling?
Why does the dentist check my bite at the end?
Does getting a filling hurt?
When can I eat after a filling?
Educational content only. Recommendations are personalized after an exam and any needed imaging.
About this article
Reviewed by Dr. Husna Khan, DDS, of Serenity Dental of Bloomingdale. Dr. Husna Khan follows evidence-based protocols including rubber dam isolation, incremental composite placement, and thorough bite adjustment to produce fillings that last longer than population averages.
Educational content. Individual filling procedures vary based on cavity depth, tooth location, and patient-specific factors. Cited sources: American Dental Association evidence-based clinical recommendations for direct composite restorations, FDA guidance on dental material safety, Cochrane Collaboration systematic reviews on isolation techniques during restorative dentistry.
Related: dental fillings service page.
Need help with this in real life?
Reading helps. Talking to someone who can look at your actual teeth and symptoms helps more. If you want a clear next step, we’re here.
Related articles
Dental filling cost in 2026: real pricing explained
Composite fillings cost $150-$550; amalgam runs $100-$400. What insurance covers, how surface count affects price, and what to expect without insurance.
Read article →Dental filling materials compared: composite vs amalgam
Composite, amalgam, glass ionomer, porcelain, gold: lifespan, cost, appearance, and which material is right for your cavity location.
Read article →What is a dental filling? Complete patient guide
A dental filling is a tooth-shaped repair that seals a cavity and restores chewing function. What fillings are made of, how they work, cost, and longevity.
Read article →